Database > RDS for MySQL > Backup and Restoration
Backup
You can prepare in advance to recover the database of DB instance in case of failure. You can perform backups through the web console whenever necessary, and you can configure to perform backups periodically. During backup, storage performance of the DB instance on which the backup is performed can be degraded. To avoid affecting service, it is better to perform back up at a time when the service is under low load. If you do not want the backup to degrade performance, you can use a high-availability configuration or perform backups from read replica.
[Note] High availability DB instances are backed up on the extra master without compromising the master's storage performance.
RDS for MySQL uses Percona XtraBackup to back up databases. You have to use the same version of Percona XtraBackup that RDS for MySQL uses to restore to backup of external MySQL or to restore to backup of RDS for MySQL Percona XtraBackup version in line with DB engine version is as follows.
| MySQL version | XtraBackup version |
|---|---|
| 5.7.15 | 2.4.28 |
| 5.7.19 | 2.4.28 |
| 5.7.26 | 2.4.28 |
| 5.7.33 | 2.4.28 |
| 5.7.37 | 2.4.28 |
| 8.0.18 | 8.0.32 |
| 8.0.23 | 8.0.32 |
| 8.0.28 | 8.0.32 |
| 8.0.32 | 8.0.32 |
| 8.0.33 | 8.0.33 |
| 8.0.34 | 8.0.34 |
| 8.0.35 | 8.0.35 |
| 8.0.36 | 8.0.35 |
- For detailed information about installing XtraBackup, visit the Percona home page.
- https://www.percona.com/doc/percona-xtrabackup/2.4/index.html
- https://www.percona.com/doc/percona-xtrabackup/8.0/index.html
[Note] On August 17, 2023, the version of the XtraBackup utility was upgraded. The XtraBackup version used for the previous backup can be found in the web console. High Availability DB instances are backed up on a candidate master to avoid degradation of data storage performance on the master.
The following settings are applied to backup, and also to auto and manual backups.
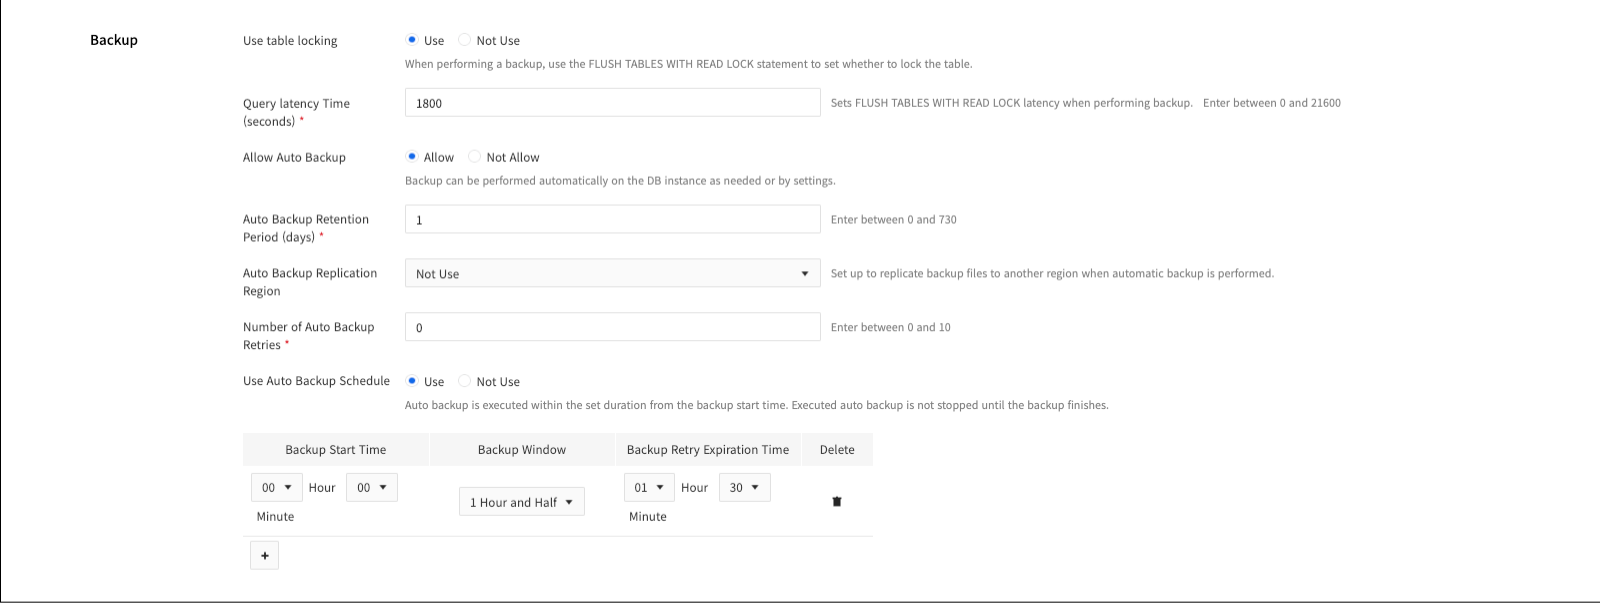
Use Table Lock
FLUSH TABLES WITH READ LOCKets whether the syntax is enabled or disabled.- Table lock enables the
FLUSH TABLES WITH READ LOCKsyntax periodically during backups to ensure consistency in backup data. IfFLUSH TABLES WITH READ LOCKsyntax fails to run, the backup will fail. - You can disable table locking if the DML query load is high during a backup. If you do not use table lock,
FLUSH TABLES WITH READ LOCKsyntax will not run, so a high DML load does not cause the backup to fail. However, backups without table lock may not ensure consistency of backup data, and as a result, some operations, including restore and replication processes, are not supported for backups created without table lock and for DB instances with table locking disabled.
Query Latency Dash Time (second)
- When using table lock, set the wait time for
FLUSH TABLES WITH READ LOCKsyntax.FLUSH TABLES WITH READ LOCKsyntax will wait for the query latency dash time. It can be set from 0 to 21,600 seconds. Longer settings reduce the likelihood of backup failures due to DML query load, but may result in longer overall backup times.
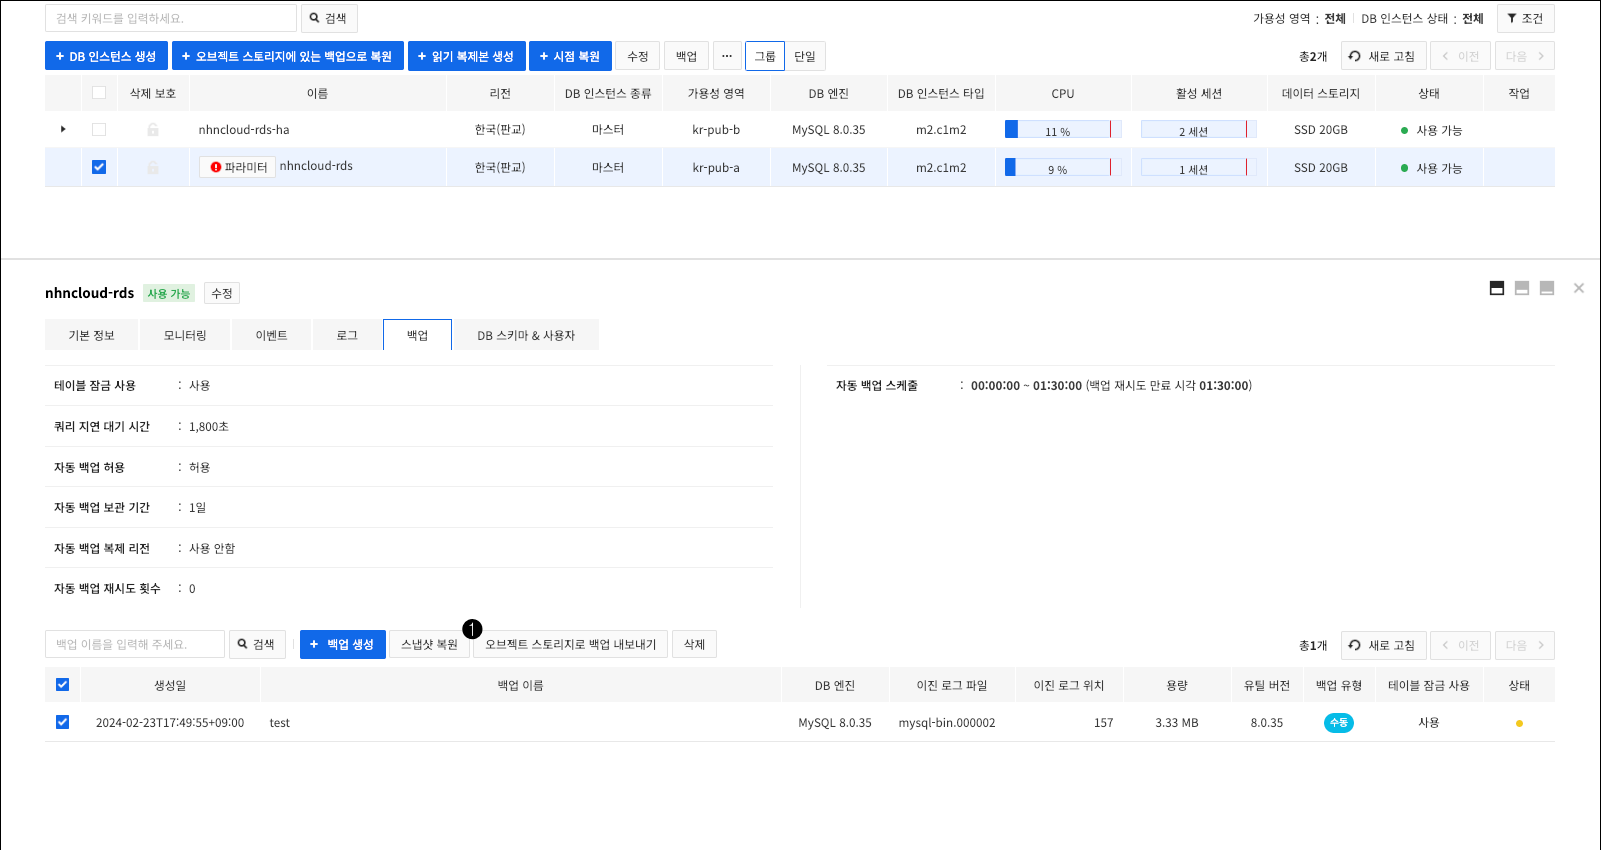
Manual Backup
If you need to permanently store databases at a certain point in time, you can perform backups manually from the web console. Unlike auto backups, manual backups are not deleted, unless you explicitly delete the backup, as they are when DB instance is deleted. To perform a manual backup from the console,

❶ After selecting the DB instance to back up, click Backup, and the Create Backup pop-up screen appears.
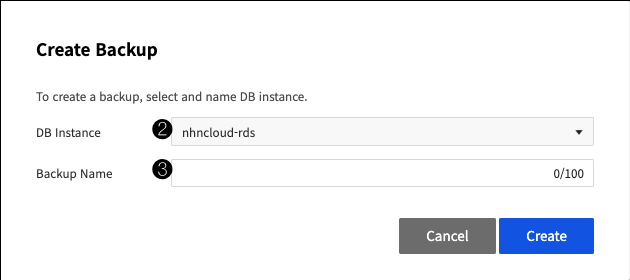
❷ If you want, change the DB instance to which you want to perform the backup. ❸ Enter a name for the backup. There are the following limitations
- Backup name has to be unique for each region.
- Backup names are alphabetic, numeric, and - _ between 1 and 100 Only, and the first character has to be an alphabet.
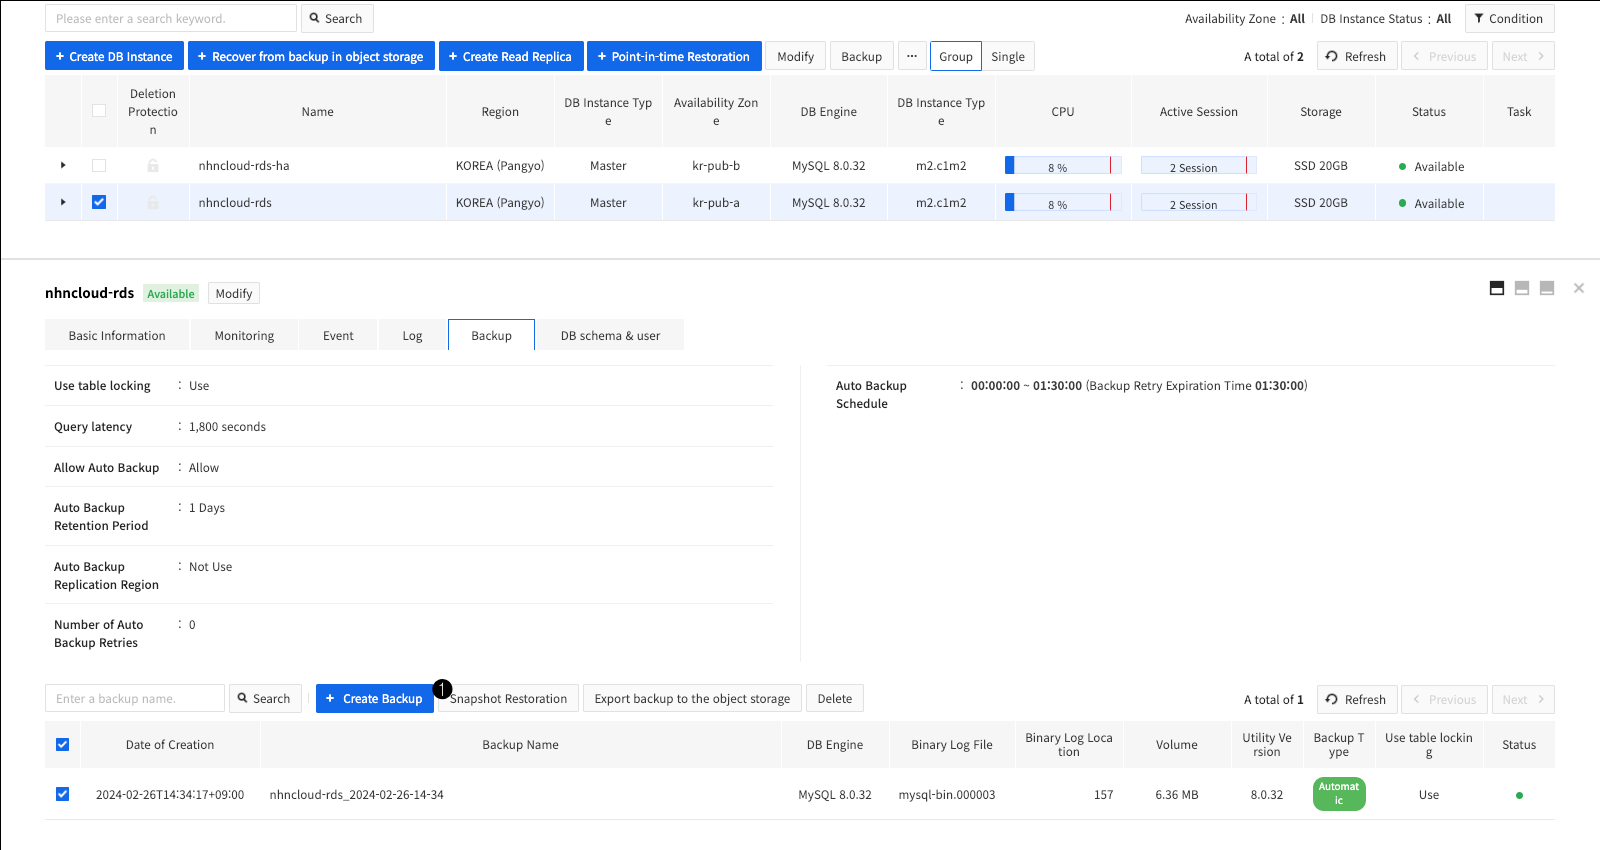
또는 백업 탭에서

❶ + 백업 생성을 클릭하면 백업 생성 팝업 화면이 나타납니다.
❷ 백업을 수행할 DB 인스턴스를 선택합니다. ❸ 백업의 이름을 입력한 뒤 생성을 클릭하면 백업 생성을 요청할 수 있습니다.
Auto Backup
In addition to manually performing backups, auto backups can occur when needed for restore operations or based on auto backup schedule settings. Auto backups have the same lifecycle as DB instances. When a DB instance is deleted, all archived auto backups are deleted. The following setting items are supported by auto backups.
Allow Auto Backup
- If you don't allow auto backups, all auto backups will be blocked from taking place, and some operations, including restore and replication processes, that might otherwise take place on demand, will not be supported. In addition, you won't be able to set the following auto backup-related items
Auto Backup Retention Period
- Sets the time period for storing auto backups on storage. It can be kept for up to 730 days, and if the auto backup archive period changes, the expired auto backup files will be deleted immediately.
Auto Backup Replication Region
- Set the auto backup file to be replicated to backup storage in another region. Auto Backup replication regions are features for disaster recovery that replicate and manage auto backup files from the original region equally to the destination region. Replication occurs in the background at regular intervals. When you set up an auto backup replication region, you are charged with inter-regional replication traffic, and the destination region is charged additionally for backup storage usage.
Number of Auto Backup Retries
- You can set the auto backup to retry if it fails due to DML query load or for other various reasons. You can retry maximum 10 times. Depending on the auto backup run time setting, you might not try again even if there are still more retries.
Use Auto Backup Schedule
- When using an auto backup schedule, backups are performed automatically at the auto backup performance time you set.
Auto Backup Run Time
- Allows you set the time that the backup automatically takes place. It consists of the backup start time, the backup window, and the backup retry expiration time. You can set the backup run time multiple times so that it does not overlap. Performs backup at any point in the backup window based on the start time of the backup. The backup window is not related to the total running time of the backup. Backup time is proportional to the size of the database and the service load. If the backup fails, retry the backup based on the number of backups retries if it does not exceed the backup retries times.
Auto backup name is given in the format of {DB instance name} yyyy-MM-dd-HH-mm.
[Caution] Backups may not be performed in some situations, such as when a previous backup fails to terminate.
Backup Storage and Pricing
All backup files are uploaded to the internal backup storage and stored. For manual backups, they are stored permanently until you delete them separately, and backup storage charges are incurred depending on the backup capacity. For auto backups, it is stored for the set retention period and charges for the full size of the auto backup file, which exceeds the storage size of the DB instance. If you do not have direct access to the internal backup storage where the backup file is stored, and when you need backup file, you can export the backup file to the object storage in NHN Cloud.
Export Backup
Export Files While Performing Backup
You can export backup files to the user object storage while performing backup.
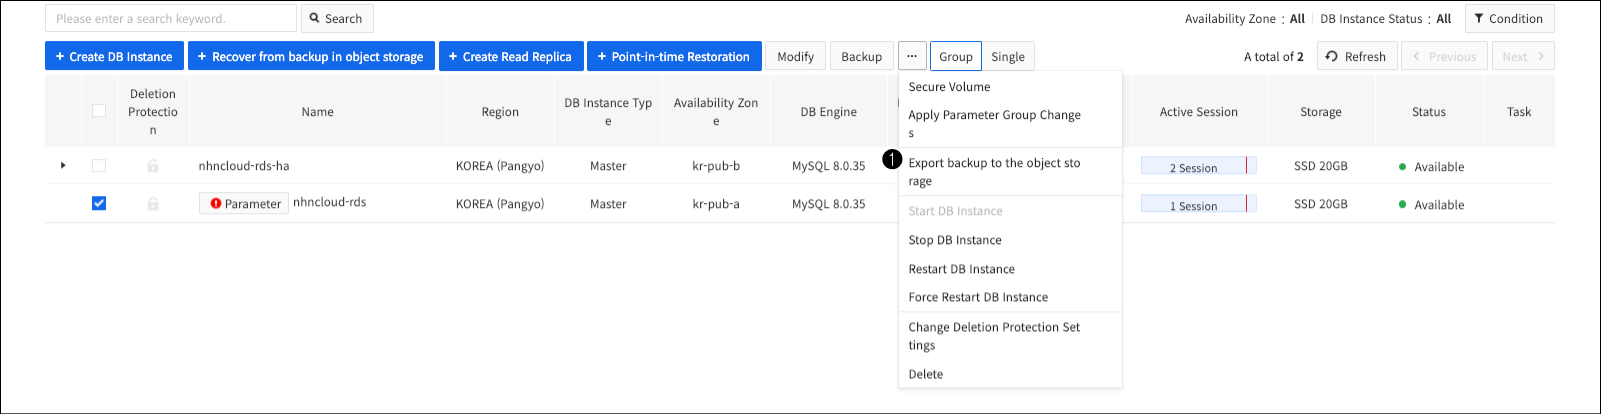
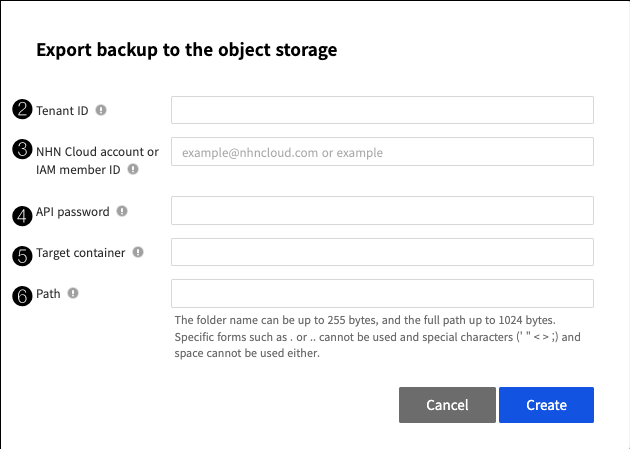
❶ Select the DB instance to back up and click Export Backup to Object Storagefrom the drop-down menu, and the settings pop-up screen will appear. ❷ Enter the tenant ID of the object storage where the backup will be saved. You can find the tenant ID in the API endpoint settings. ❸ Enter the NHN Cloud member or IAM member of the object storage where the backup will be saved. ❹ Enter the API password of the object storage where the backup will be saved. ❺ Enter the container of the object storage where the backup will be saved. ❻ Enter the path to the backup that will be stored in the container. The folder name can be up to 255 bytes, and the full path can be up to 1024 bytes. Certain forms (. or ..) are not allowed, and special characters (' " < > ;) and spaces are not allowed.
Export Backup Files
You can export backup files stored on your internal backup storage to user object storage in NHN Cloud.
❶ On the Details tab of the source DB instance from which the backup was taken, select the backup file to export and click Export Backup to Object Storage, and a pop-up screen will appear to export the backup.

Select the backup file to export from the Backup tab and click Export to Object Storage.
[Note] For manual backups, if the source DB instance that performed the backup was deleted, you cannot export the backup.
Restoration
Backups allow you to restore data to any point in time. Restoration always creates new DB instance and cannot be restored to the existing DB instance. You can restore only to the same DB engine version as the source DB instance from which you performed the backup. Supports restoring snapshots to the point in time when the backup was created, and restoring point in time to a specific point in time. You can restore it as backup of external MySQL as well as backup that you created in RDS for MySQL.
[Caution] Restoration might fail if the data storage size of the DB instance that you want to restore is smaller than the data storage size of the source DB instance that you backed up, or if you use a different parameter group than the parameter group of the source DB instance.
Snapshot Restoration
You can restore using only the backup file, so you don't need the original DB instance from which the backup was taken. To restore a snapshot from the web console,
❶ Select the backup file you want to restore On the details tab of the dB instance, and then click Restore Snapshotto go to the Restore DB instance screen.
Or

❶ On the Backup tab, select the backup file you want to restore, and then click Restore Snapshot.
Point-in-time Restoration
Restoring to a particular point in time is called point-in-time restoration. You can restore to a specific position in the binary log, as well as to restore to a specific time. Point-in-time restoration requires backup file and binary log from the time you performed the backup to the time you wanted the restore. Binary logs are stored in the storage of the source DB instance where the backup is performed. Shorter binary log retention period allows you to use more storage capacity, but it may be difficult to restore to the desired point in time. For the cases listed below, you may not be able to restore to the desired point in time because there is no binary log required for point-in-time restoration.
- When you have deleted the binary log of the source DB instance for securing capacity
- When the binary log is automatically deleted by MySQL based on the Binary log retention period
- When a binary log is deleted due to a failover of a high availability DB instance
- When binary logs are corrupted or deleted for various other reasons
To restore a point in time from the web console

❶ Select the DB instance you want to restore to a point in time and click + Restore Point-In-Time to go to the page where you can set up a point in time restore.
Restore with Timestamp
When restoring with a timestamp, proceed with the restoration based on the backup file closest to the selected point in time, and then applies a binary log up to the desired point in time.

❶ Select a restore method.

❷ Select a restore time. You can restore to the most recent point in time, or you can enter a specific point in time.
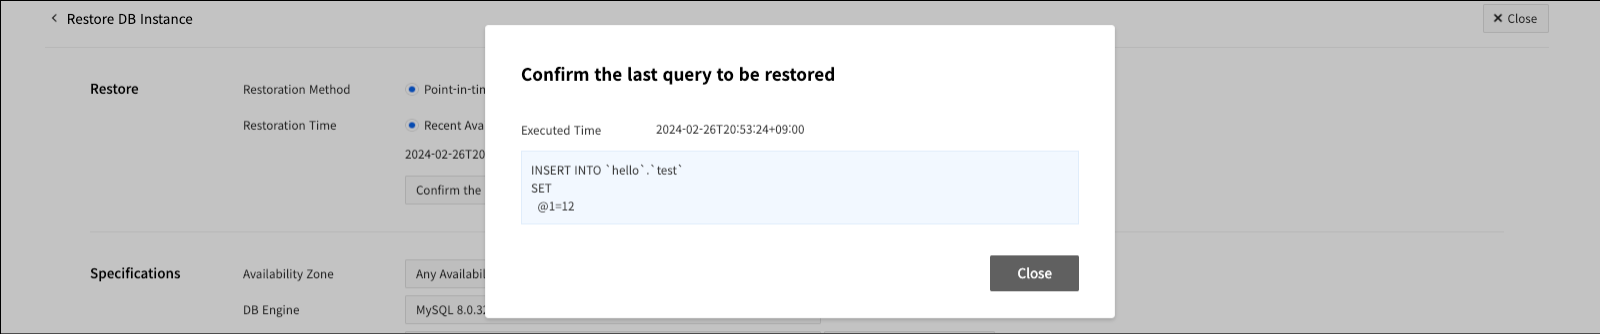
❸ Click Confirm the last query to be restored to display a pop-up screen where you can confirm the last query to be restored.
Restore using binary logs
The restore with binary log process first restores to the selected backup file and then applies the binary log to the desired location.

❹ To restore to a binary log, you must first select a backup file. ❺ Select a binary log file. ❻ Enter a specific location for the binary log.
Restoration with External MySQL Backup
You can use an external MySQL backup file to create a DB instance. When creating an external MySQL backup file, refer to Backup and use the same version as the Percona XtraBackup used by RDS for MySQL.
[Caution] If the setting value of innodb_data_file_path is not ibdata1:12M:autoextend, it is unable to restore to DB instance of RDS for MySQL.
(1) Use the command below to perform a backup on the server where MySQL is installed.
XtraBackup 2.4.xx Example
innobackupex --defaults-file={my.cnf path} --user {user} --password '{password}' --socket {MySQL socket file path} --compress --compress-threads=1 --stream=xbstream {directory where create backup file} 2>>{backup log file path} > {backup file path}
XtraBackup 8.0.xx Example
xtrabackup --defaults-file={my.cnf path} --user={ user } --password='{ password }' --socket={MySQL socket file path } --compress --compress-threads=1 --stream=xbstream --backup { directory where create backup file } 2>>{ backup log file path } > { backup file path }
(2) Check that completed OK! is in the last line of the backup log file. If there is no completed OK!, the backup did not end successfully, so refer to the error message in the log file to proceed with the backup again.
(3) Upload the completed backup file to the object storage.
- The maximum file size that can be uploaded at a time is 5GB.
- If the backup file is larger than 5GB, you have to use a utility such as split to cut the backup file to less than 5GB and upload it in multi-part.
- For detailed information, refer to Multipart Upload.
(4) After accessing the web console of the project you want to restore, on the DB Instances tab, click the Restore to Backup in Object Storage button.
[Caution] In the current version of 5.7.33, restoring DB instances using backup files on object storage is restricted. If use a version other than the recommended XtraBackup, it may not work properly. The backup file on the object storage has to be the same version of MySQL that you want to restore.
Restoration by Using RDS for MySQL Backup
You can use the backup file in RDS for MySQL to restore the database in MySQL directly. When restoring a RDS for MySQL backup file, refer to the Backup and use the same version as Percona XtraBackup used by RDS for MySQL.
(1) Export backup of RDS for MySQL to object storage with reference to the Export Backup.
(2) Download the backup of the object storage to the server on which you want to restore it.
(3) Stop the MySQL service.
(4) Delete all files in the MySQL data storage path.
rm -rf {MySQL data storage path}/*
(5) Unzip and restore the downloaded backup files.
XtraBackup 2.4.xx Example
cat {backup file storage path} | xbstream -x -C {MySQL data storage  path}
innobackupex --decompress {MySQL data storage path}
innobackupex --defaults-file={my.cnf path} --apply-log {MySQL data storage path}
XtraBackup 8.0.xx Example
cat { backup file storage path } | xbstream -x -C {MySQL data storage  path }
xtrabackup --decompress --target-dir={MySQL data storage  path }
xtrabackup --prepare --target-dir={MySQL data storage  path }
xtrabackup --defaults-file={my.cnf path} --copy-back --target-dir={MySQL data storage  path }
(6) Delete unnecessary files after unzipping files.
find {MySQL data storage path } -name "*.qp" -print0 | xargs -0 rm
(7) Start MySQL service.